Showing posts with label DIY. Show all posts

Friday, 16 July 2010

Winding Sticks

While making my table top, I needed some way to check if the boards were flat. Eyeballing the boards is not really accurate. I read up about it and found out about winding sticks.
I took a piece of scrap wood from my offcut bin and broke it in half to test the theory.
Wow! These little planks really work!
They are extremely easy to use and accurately tell you if the board is not flat.

The wikipedia entry on winding sticks mentions that contrasting wood is often used.
Yeah??
Guess what .. that's exactly what I have.
Contrasting Obeche and Sapele Mahogany strips which are waiting for my boat build to start.
I simply pasted them together to form a stick.
Once I saw them finished, I decided to get a little fancy and insert a strip of the opposite wood as a "centerline" on each stick.
I am hugely satisfied with my new toys.
One benefit to making the winding sticks, was getting to see the colour of my strips with some 'finish' on them.


I used Deep Penetrating Furniture Wax from Woodoc. This brought out the colours with amazing depth. I was actually quite stunned at how beautiful the Sapele Mahogany is. I have subsequently put on a few layers of Antique Wax, also from Woodoc.


Monday, 5 July 2010

Chasing your tail .. and getting bitten

Sometimes life gets frustrating for no good reason.
I have waited patiently for the wood strips to arrive for my boat project.

In the meantime I have been dabbling with various other ideas for projects which could run concurrently to the boat project since the boat is really a long term thing.
First off, I must repeat that the space I have is really limited and the boat will take up a great deal of it. For that reason I have been trying to decide if I should make tackle some of my other ideas first.

I need to make a second dog kennel for selling. This will not take very long, but it's a project that would be completed with more ease, if the boat forms are not yet installed on the strongback and taking up two thirds of the garage. Material needs to be ordered if I go ahead with this idea.

A friend caught up with me a few days ago and wants a custom piece of furniture. If I can complete this project to satisfaction, there will be an order for two more immediately, with the possibility of more orders after that. I think this project has serious potential and am waiting for the customized draft plans for the piece before I can proceed with it.

This led me to buying a book which has a plan similar to the custom piece my friend wants. The book has been tempting me for a while and I just needed a reason to buy it. Now I have the book, for a good reason and amongst other things, there is a beautiful plan for a dining table... for which I have some lovely wood for a top.
I think I must make such a table.

There.
So much to do.
  1. Boat
  2. Dog Kennel
  3. Dining Table
  4. "Custom" furniture order (more about this later)
So my strips arrive on Thursday. This is nine days after delivery was due, but as I said earlier, I waited patiently.
The strips are beautiful and I am very happy, but they never sent the two sapele mahogany boards that I ordered with the strips. I thought I had more mahogany strips than ordered, so I figured they cut strips from all the planks, instead of saving two.
On Friday I went to the lumber merchant to get clarification.
When I got there, the guy who always helps me, rushed to tell me that he had my two planks and they were due for delivery again that same day. Ok, cool! (They've not been delivered - apparently I can now expect them on Monday. Tuesday will be fourteen days after the original promised delivery date)

So since I was already at the lumber yard, I bought a little extra wood for legs, rail and support framework for the dining table project.
One of the lumber yard customers approached me, asking if I could make him a special wine-rack. I gave him my cell-phone number. Seems like I get approached for things from all quarters.

Whilst busy selecting wood, waiting for the planks to be trimmed and planed, I got distracted and "lost" my cellphone.
We called it from the office, it rang to voicemail, then when it was called again it was switched off. It's nowhere to be found - so it's undoubtedly been pilfered.

It's such an inconvenience. 6 years worth of numbers and contact details gone. I cannot get a replacement until Wednesday at the earliest, but I'll try to get my existing number...
My wine rack customer is probably calling me and wondering why I never answer my phone.

If the Mahogany planks were delivered as they should have been, I'd never have been at the lumber merchant on Friday afternoon.
The boat already has a sad memory attached to it. :(

Tuesday, 29 June 2010

How I create a butt-joint

Simply said, a butt-joint is a very easy joint to make, but it is not very pretty or strong. Much depends on which method you use, but most often this joint is held together by the glue in the joint.
I try to always add some dowels to my butt-joints. The wiki entry has some good descriptions and pictures of butt-joints, but here is my version.


Most often I use 6mm ready-made dowels. These are normally slightly grooved and thus hold a bit more glue. Another option is to purchase a 6mm stick and cut custom lengths.

Saturday, 26 June 2010

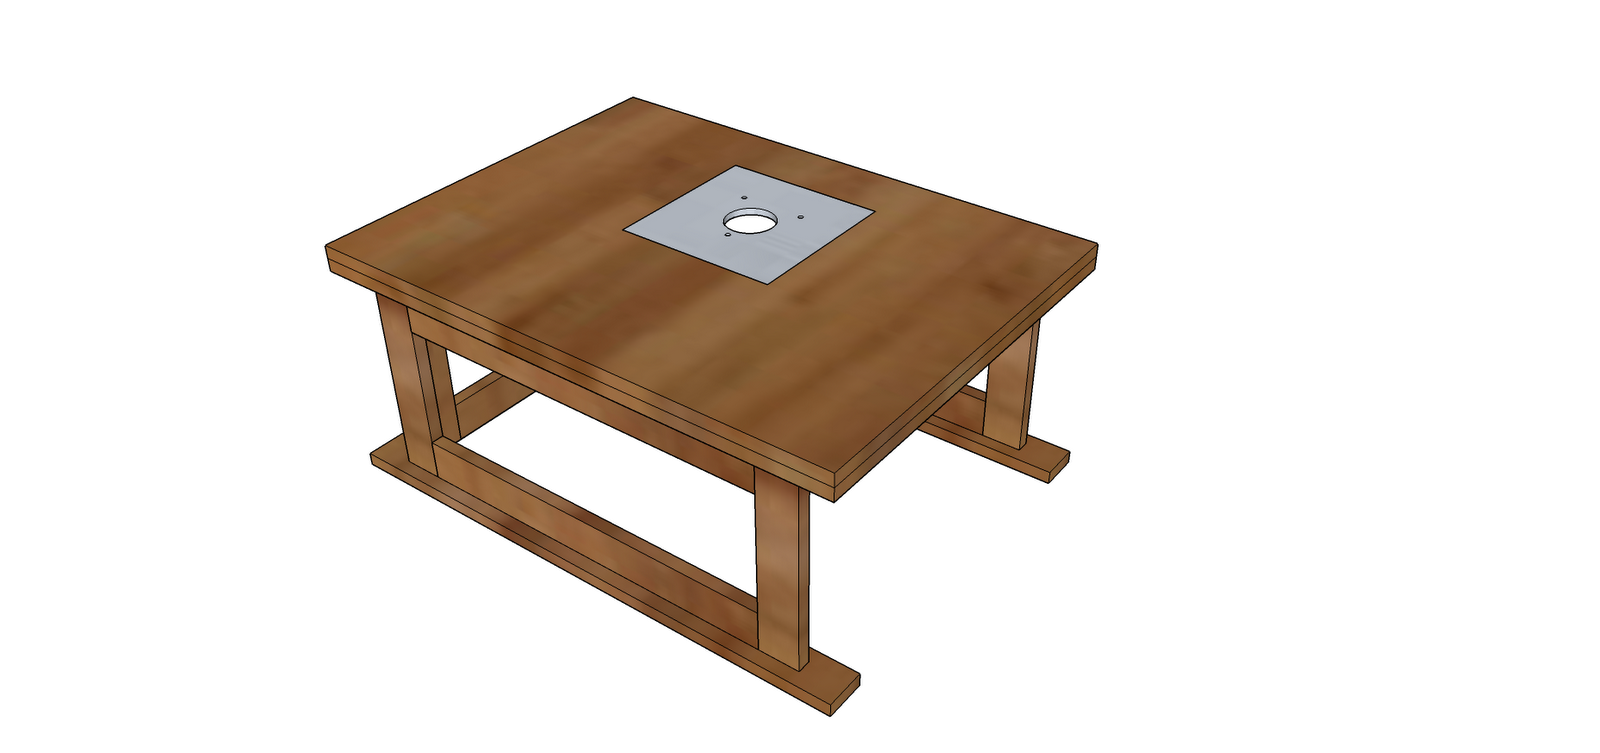
Step-by-Step tutorial to create a desktop router table. (Part I)

Original plans for the basic table referred to in this tutorial come from Jeff Greef Woodworking. Modifications were made to suit my preferences.
All measurements and joints can be altered to your requirements or skill levels. Since my lack of tools and/or skills prohibit me from making even simple lap-joints, all joints used in this table are butt-joints with dowels and glue holding it all together.

Materials Used:

All these pieces are from 16mm MDF (Supawood)
  1. (Number 1): 670mm x 50mm x 16mm (2 pieces)
  2. (Number 2): 250mm x 50mm x 16mm (6 pieces)
  3. (Number 3): 470mm x 50mm x 16mm (4 pieces)
  4. (Number 4): 318mm x 50mm x 16mm (2 pieces)
  5. (Number 5): 670mm x 495mm x 16mm (2 pieces)

Step 1: Using 2 feet pieces (Number 1), lay them out parallel, 395mm apart.


Step 2: Create the left side using 2 uprights (Number 2) and 2 crosspieces (Number 3). This side fits into the center of the foot piece as shown.

Step 3: Duplicate Step 2 to create the right side.


Step 4: Use 2 uprights (Number 2) and 2 crosspieces (Number 4), to create an end piece.


Step 5: Use 2 tabletop pieces (Number 5), aligned with the foot pieces, to create a table top.


This is your basic table for a router.

Attaching a router to the bottom of this table top is not an option with the table top being 32mm thick. We need a router plate.
  • Using a 200mm x 200mm x 8mm piece of aluminium I cut a center hole for the router bit (60mm dia). In future, additional router plates can be cut, which would have larger or smaller holes for different bits.
  • Drill holes to fix your router to the router plate - these holes will vary depending which model router you have.
  • The hole in the table top for the router plate is cut off-center, simply as it is my preference - gives more table room for work pieces. The router plate hole is 8mm deep and 200mm x 200mm. I simply set the router to 8mm deep, and clamped guides to the table top and routed the hole. The rounded corners were chiseled square to accommodate the square plate. (You might want to round the corners of the aluminium plate rather, but again, it is personal preference.)
  • Leaving a lip of 15mm around the inside of the router plate hole, a 170mm x 170mm hole is then cut all the way through the table top.
  • This leaves us with the router table, complete with router plate to which to attach a router.


I will continue this tutorial later by creating a fence for this router table.

Sunday, 13 June 2010

Better internet advertising please...

I cannot understand the uselessness of South African companies when it comes to advertising on the internet.
There is a huge untapped market out there, yet no-one seems interested in using it.
Searching for materials for my boat build has shown me the futility of using the internet. It basically just creates sadness.
I search for product, find great solutions, the perfect item, then I try to find a supplier in South Africa and I run into a brick wall.

Here are some examples...
1. I searched for oversize carbon paper (or any tracing paper). This is available overseas from numerous sources, one being Glen-L, who supply oversize sheets. After 3 days of searching in South Africa, I eventually found a company who makes carbon paper. They will supply me, if I buy 500 sheets @ R3600.00 ... yea thanks... but no thanks.

2. I searched for a thin kerf blade. If I am going to mill strips for my cedar strip boat, I will need to cut 5mm thick strips. If I can get a thin kerf blade which wastes only 2mm per cut (as compared to the normal blade which wastes 3mm per cut) then I basically get a free strip for every five cuts. Economically this will save a lot of wood, ermmm rands too. Nowhere can you find out who supplies saw blades in South Africa. Three different local hardware stores cannot help. Neither can they get one for me, nor tell me who to contact. The average employee at a hardware store knows nothing about the products his store is selling and basically they want me to use what they have in store.
I finally found Bantam. I called them and got hold of a lady called Vanessa. This lady was amazing. She understood my needs, spent time on my concerns and gave me a list of hardware stores and tool centers that should be able to help me. She gave company names, addresses, contact numbers of six different companies and then told me that if I still had problems, to call her back and she'd sort it out.
Wow. I like that for service. So few and far between. Suffice to say that I finally found someone who could get me a blade. A special order, and I have to wait a few days for it to arrive, but at least the gentleman knew how to help me.
Thank you to Vanessa from Bantam.

3. T-track. This stuff is so common in USA that there is a website called ttrackusa. I want some of this to create a track in my desktop. So that I can slide a fence, or clamps along the face ... or along the sides.. of my desk.
Well, no-one in South Africa knows what this stuff is, nor has ever heard of aluminium such as this.
I went to a shop specialising in non-ferrous metals and although they had huge warehouses full of different aluminium extrusions, nothing was remotely close to what I need.
Eventually I went to Chamberlain's and bought four pieces of 2.5m long 20mmx10mm aluminium rectangle for R40 each. I then went to a guy who makes aluminium windows and asked him if he would cut a strip out of the one side to create my own "t-track". He said no problem, and proceeded to rip me off with the price when I collected next day. Instead of R60 like he verbally quoted me, it was suddenly R50 per cut - more than the price of the original material. Still I was fairly happy in that I had the track I wanted. cost R90 per 2.5m length. The cutting did leave some nasty "burrs" on the inside of the cut, but a fine file, followed by 600grit sand paper took care of that.

Here is a sample of the track embedded in a "desktop"

... and this is what I used it for ... a fence/clamping system for my drill press ...

I will use the T-track for a number of other applications and will post about it when I get round to it.

These examples above are just a few of the multiple examples I have of struggling to find products.
Finding advice on which type of South African timber to use in my boat building project has been just such a mission. Most people or companies who have been approached do not even have the decency to reply. I am still struggling to find out exactly what I am going to use, but at the end of the day, I will solve it... and my project will taste all that much sweeter, due to the struggles in getting it completed.

The bottom line remains, that whilst plenty product is available in South Africa, finding it is the problem. Even companies with websites, do not advertise their product correctly.
One such example is marine-grade plywood. I struggled for many days to find this. The only supplier I could find on the internet was a guy in Cape Town. The transport cost to Pretoria is prohibitive. A few days later I was speaking to someone about lumber at a lumber supply yard and by chance I asked about marine-grade plywood. They told me to call Schallies. Perfect. A friendly and helpful sales consultant called Harold, all the marine-grade plywood I could ever want and cheaper than the Cape Town price. Right now, I just cannot remember if delivery was free in Pretoria or if it was R100. Either way, it's a bargain.

Dust Busting

So just yesterday I got a call from Craig in England. We ended up discussing dust, and the second hand machines he is able to find at their "dump sites". Ya, so today I am busy cleaning my garage and I am using Abby's Hoover vacuum cleaner. Next minute it stops working, just dead.

Is that some kinda magic?? or karma??

I'll need to make a plan to get her a new vacuum. As if I do not have enough headaches looking at all the tools and not knowing which I REALLY need or can afford, I now have to learn about vacuum cleaners. ... and less money to spend on building boat.
But since I am going to end up using the vacuum the most, I am not really complaining too much :)

I am wondering if the motor of this vacuum can be salvaged - perhaps even re-incarnated .. I wonder.

Sunday, 6 June 2010

Cordless Drills and Batteries

So I have this Bosch PSR 1440 cordless drill that I bought a few years ago.
I've never been a great believer in these cordless tools, but my younger brother Craig was always bragging about how useful his was.
Although I never used it on a daily basis, I must say that it's been a great tool.
For the last eight months I have not used it at all and when I started some DIY projects, I was distressed to find that the battery held hardly any charge.
Eight 3.5mm x 60mm into MDF and the battery is dead.

Searching for a battery, shows me nothing in South Africa, but I can get them from UK for £30+ plus postage and VAT when it lands here. For equivalent of about £40 I can go to Makro and get a new drill.

So I write Craig an email and mention it to him. Craig suggests I google "freezing drill batteries". I found one or two articles/forum topics but as usual they are either off topic, or venture off topic really fast, before delivering the "good stuff".

So I take the battery, place it in a ziplock plastic bag and left it in the freezer for 24 hours. After the freeze I immediately placed it in the charger and left it there overnight.

All I can say is that the drill is much better.
I have not done a comparative test with the same screws but I did fourty eight 3.5mm x 30mm wood screws into plywood before the battery showed any signs of weakening.
Although I cannot prove it, it seems the battery is holding even better on subsequent charges.

Ultimately this has turned a very frustrating situation into a more managable one and hopefully extends the life of my drill for a few more months.