Showing posts with label Tools. Show all posts

Sunday, 25 July 2010

Using Winding Sticks

In a previous post, I introduced winding sticks but did not explain in detail how they are used.

Winding sticks are used in pairs.
If your two sticks are of contrasting colours it is much easier to see them independently. Sticks of the same colour tend to blend into each other making the sighting job more difficult.


One stick is laid at each end of a board or plank, while the user then sights over the two sticks - try to center your view and align the middle of the two winding sticks. (This is why I put center-marks onto my pair of winding sticks.)
Align your view so that you just see the farthest stick sticking out above the top of the closest stick.


On a good and flat board/plank, as pictured above, you will immediately see that the two sticks are aligned. As you dip your view lower and the farthest stick disappears from view, the entire stick disappears from view at the same instant.


On a twisted, non-flat board/plank, as pictured above, the two sticks will not line up. The farthest stick will have an obvious slant in comparison to the closest stick. The illustration above shows a board with an exaggerated amount of twist, but I guarantee you that your eye will see even the slightest twist immediately, if you use these sticks as directed.

Friday, 16 July 2010

Buying a plane

I need a plane to flatten boards for my table, so I have been shopping around. All that seems to be available is the Stanley no. 4 planes. I want a larger plane, preferrably a No 7.
I've been to numerous shops, starting with a few pawn shops in the area. My thinking is that most second hand planes should be good. A plane could/should last a lifetime!?! Not so?

I eventually found a larger plane at the supplier where I bought my table saw. New.
I was well pleased, since I am happy with the saw, although the price is a bit more than I wanted to spend initially. But, I need the plane, cannot find one anywhere, so let's go for it.

The plane in question is a No6 Jack Plane by Industro. I have no idea about brands and such, but I reckon that if Pretoria Tool Center are selling them, they should be pretty decent.
Wrong.
I brought my new plane home, and immediately was upset. The bolt on which the blade-depth screw turns, was completely stripped.
I called up the next morning and the manager tells me to bring the plane back, he'll swop it out.
I drive all the way to center of town the next day. The one other plane he has in the shop, has exactly the same problem.
I should have cut my losses right there.
Instead I allowed him to replace the defective bolt and screw, with a similar part from a smaller plane. I headed home with my fixed-up, brand new No 6 jack plane.
Pfffft.
I tested it and tested it, and for the life of my I could not get the blade square. It kept digging out chunks of wood with the right-hand edge of the blade, no matter what I did.
Let me make it real clear right now .. I am no expert when it comes to woodworking, but I am not a complete idiot. I can figure most things out.
I eventually took the blade out for the umpteenth time and held the side of the blade to my try-square handle... with the blade being 58mm across, it moved away from the try-square blade by 1mm across it's width.
I know this method of measuring cannot give me great accuracy, but this comes to around 10 degrees by which the blade is not square on the cutting edge. I am simply not happy with that.
I called up the supplier and the manager told me about the lever which moves the blade from side to side, suggesting I use that to straighten the blade. That does not work, I have it moved over as far as possible and that corner still bites into the wood.
The manager suggested that I then tweak the blade 'skew' against the cap-iron, in order to get it straight at the mouth.
No way!!! ... If I buy a car, the dealership cannot expect me to crank the steering wheel all the way to the left .. in order for the car to drive straight!

I'm taking it back.
The manager did not sound to happy, and mumbled something about giving me something of equal value.
That's not going to work either.
I do not need anything else.
I do not want anything else.
... a plane ... a No 6 or a No 7 ... a decent working one ... that's what I want, or my money back.

In honesty, I could have fixed the stripped bolt problem. Although, being 'backwards' thread it would have cost a little bit extra to get a bolt.
I can also have the blade re-ground to 90 degrees at an engineering shop, or if I find a sharpening place... but you know, I just spent R595.00 on this plane. Why should I still need to go to all that trouble to fix it when it's brand new?

This will be the third trip to the center of town, 30km each way. Plus it's been helluva inconvenient.

Winding Sticks

While making my table top, I needed some way to check if the boards were flat. Eyeballing the boards is not really accurate. I read up about it and found out about winding sticks.
I took a piece of scrap wood from my offcut bin and broke it in half to test the theory.
Wow! These little planks really work!
They are extremely easy to use and accurately tell you if the board is not flat.

The wikipedia entry on winding sticks mentions that contrasting wood is often used.
Yeah??
Guess what .. that's exactly what I have.
Contrasting Obeche and Sapele Mahogany strips which are waiting for my boat build to start.
I simply pasted them together to form a stick.
Once I saw them finished, I decided to get a little fancy and insert a strip of the opposite wood as a "centerline" on each stick.
I am hugely satisfied with my new toys.
One benefit to making the winding sticks, was getting to see the colour of my strips with some 'finish' on them.


I used Deep Penetrating Furniture Wax from Woodoc. This brought out the colours with amazing depth. I was actually quite stunned at how beautiful the Sapele Mahogany is. I have subsequently put on a few layers of Antique Wax, also from Woodoc.


Saturday, 26 June 2010

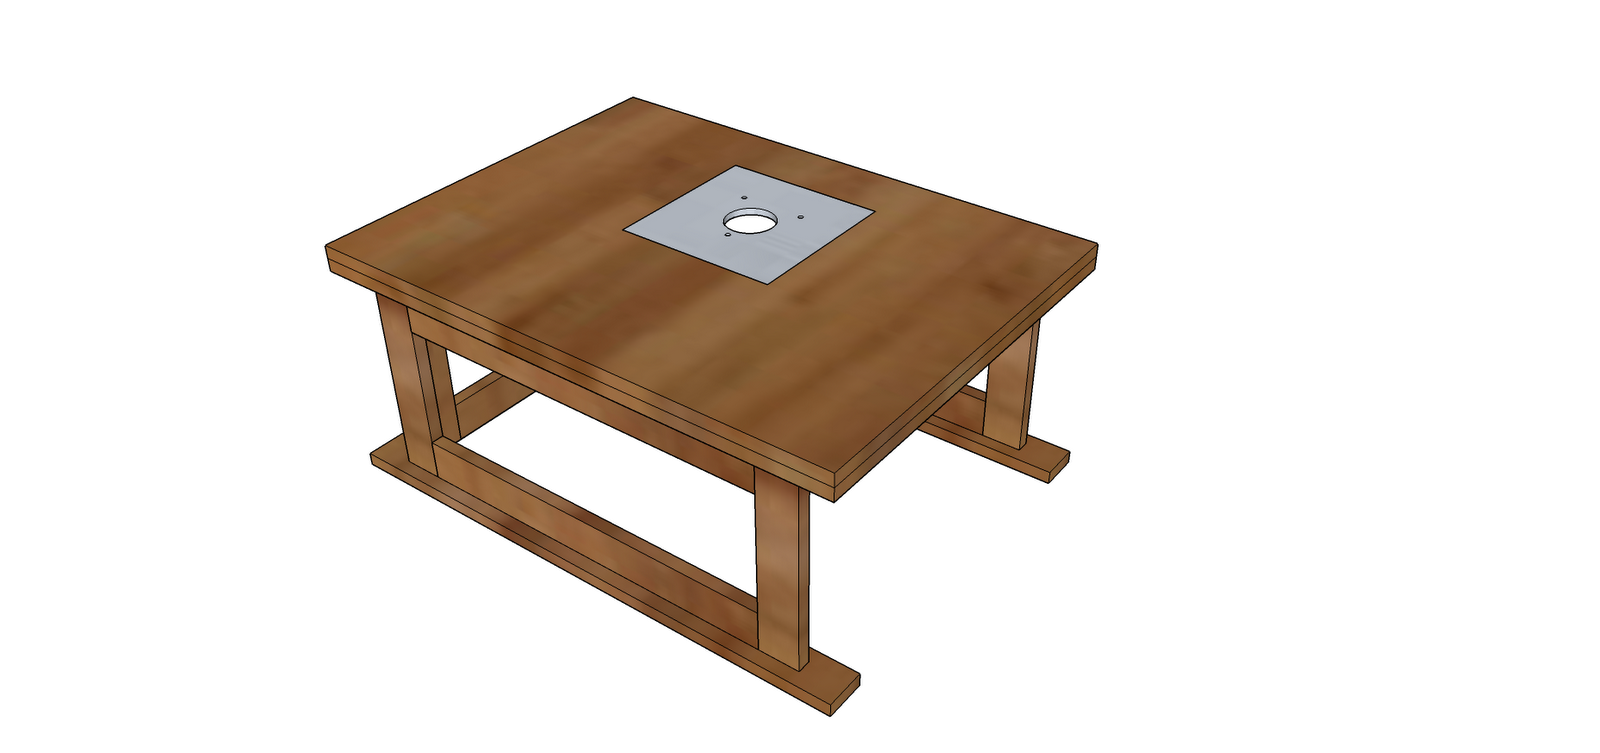
Step-by-Step tutorial to create a desktop router table. (Part I)

Original plans for the basic table referred to in this tutorial come from Jeff Greef Woodworking. Modifications were made to suit my preferences.
All measurements and joints can be altered to your requirements or skill levels. Since my lack of tools and/or skills prohibit me from making even simple lap-joints, all joints used in this table are butt-joints with dowels and glue holding it all together.

Materials Used:

All these pieces are from 16mm MDF (Supawood)
  1. (Number 1): 670mm x 50mm x 16mm (2 pieces)
  2. (Number 2): 250mm x 50mm x 16mm (6 pieces)
  3. (Number 3): 470mm x 50mm x 16mm (4 pieces)
  4. (Number 4): 318mm x 50mm x 16mm (2 pieces)
  5. (Number 5): 670mm x 495mm x 16mm (2 pieces)

Step 1: Using 2 feet pieces (Number 1), lay them out parallel, 395mm apart.


Step 2: Create the left side using 2 uprights (Number 2) and 2 crosspieces (Number 3). This side fits into the center of the foot piece as shown.

Step 3: Duplicate Step 2 to create the right side.


Step 4: Use 2 uprights (Number 2) and 2 crosspieces (Number 4), to create an end piece.


Step 5: Use 2 tabletop pieces (Number 5), aligned with the foot pieces, to create a table top.


This is your basic table for a router.

Attaching a router to the bottom of this table top is not an option with the table top being 32mm thick. We need a router plate.
  • Using a 200mm x 200mm x 8mm piece of aluminium I cut a center hole for the router bit (60mm dia). In future, additional router plates can be cut, which would have larger or smaller holes for different bits.
  • Drill holes to fix your router to the router plate - these holes will vary depending which model router you have.
  • The hole in the table top for the router plate is cut off-center, simply as it is my preference - gives more table room for work pieces. The router plate hole is 8mm deep and 200mm x 200mm. I simply set the router to 8mm deep, and clamped guides to the table top and routed the hole. The rounded corners were chiseled square to accommodate the square plate. (You might want to round the corners of the aluminium plate rather, but again, it is personal preference.)
  • Leaving a lip of 15mm around the inside of the router plate hole, a 170mm x 170mm hole is then cut all the way through the table top.
  • This leaves us with the router table, complete with router plate to which to attach a router.


I will continue this tutorial later by creating a fence for this router table.

Sunday, 13 June 2010

Dust Busting

So just yesterday I got a call from Craig in England. We ended up discussing dust, and the second hand machines he is able to find at their "dump sites". Ya, so today I am busy cleaning my garage and I am using Abby's Hoover vacuum cleaner. Next minute it stops working, just dead.

Is that some kinda magic?? or karma??

I'll need to make a plan to get her a new vacuum. As if I do not have enough headaches looking at all the tools and not knowing which I REALLY need or can afford, I now have to learn about vacuum cleaners. ... and less money to spend on building boat.
But since I am going to end up using the vacuum the most, I am not really complaining too much :)

I am wondering if the motor of this vacuum can be salvaged - perhaps even re-incarnated .. I wonder.

Sunday, 6 June 2010

Cordless Drills and Batteries

So I have this Bosch PSR 1440 cordless drill that I bought a few years ago.
I've never been a great believer in these cordless tools, but my younger brother Craig was always bragging about how useful his was.
Although I never used it on a daily basis, I must say that it's been a great tool.
For the last eight months I have not used it at all and when I started some DIY projects, I was distressed to find that the battery held hardly any charge.
Eight 3.5mm x 60mm into MDF and the battery is dead.

Searching for a battery, shows me nothing in South Africa, but I can get them from UK for £30+ plus postage and VAT when it lands here. For equivalent of about £40 I can go to Makro and get a new drill.

So I write Craig an email and mention it to him. Craig suggests I google "freezing drill batteries". I found one or two articles/forum topics but as usual they are either off topic, or venture off topic really fast, before delivering the "good stuff".

So I take the battery, place it in a ziplock plastic bag and left it in the freezer for 24 hours. After the freeze I immediately placed it in the charger and left it there overnight.

All I can say is that the drill is much better.
I have not done a comparative test with the same screws but I did fourty eight 3.5mm x 30mm wood screws into plywood before the battery showed any signs of weakening.
Although I cannot prove it, it seems the battery is holding even better on subsequent charges.

Ultimately this has turned a very frustrating situation into a more managable one and hopefully extends the life of my drill for a few more months.