Sunday 25 July 2010

Using Winding Sticks

In a previous post, I introduced winding sticks but did not explain in detail how they are used.

Winding sticks are used in pairs.
If your two sticks are of contrasting colours it is much easier to see them independently. Sticks of the same colour tend to blend into each other making the sighting job more difficult.


One stick is laid at each end of a board or plank, while the user then sights over the two sticks - try to center your view and align the middle of the two winding sticks. (This is why I put center-marks onto my pair of winding sticks.)
Align your view so that you just see the farthest stick sticking out above the top of the closest stick.


On a good and flat board/plank, as pictured above, you will immediately see that the two sticks are aligned. As you dip your view lower and the farthest stick disappears from view, the entire stick disappears from view at the same instant.


On a twisted, non-flat board/plank, as pictured above, the two sticks will not line up. The farthest stick will have an obvious slant in comparison to the closest stick. The illustration above shows a board with an exaggerated amount of twist, but I guarantee you that your eye will see even the slightest twist immediately, if you use these sticks as directed.

Friday 16 July 2010

Buying a plane

I need a plane to flatten boards for my table, so I have been shopping around. All that seems to be available is the Stanley no. 4 planes. I want a larger plane, preferrably a No 7.
I've been to numerous shops, starting with a few pawn shops in the area. My thinking is that most second hand planes should be good. A plane could/should last a lifetime!?! Not so?

I eventually found a larger plane at the supplier where I bought my table saw. New.
I was well pleased, since I am happy with the saw, although the price is a bit more than I wanted to spend initially. But, I need the plane, cannot find one anywhere, so let's go for it.

The plane in question is a No6 Jack Plane by Industro. I have no idea about brands and such, but I reckon that if Pretoria Tool Center are selling them, they should be pretty decent.
Wrong.
I brought my new plane home, and immediately was upset. The bolt on which the blade-depth screw turns, was completely stripped.
I called up the next morning and the manager tells me to bring the plane back, he'll swop it out.
I drive all the way to center of town the next day. The one other plane he has in the shop, has exactly the same problem.
I should have cut my losses right there.
Instead I allowed him to replace the defective bolt and screw, with a similar part from a smaller plane. I headed home with my fixed-up, brand new No 6 jack plane.
Pfffft.
I tested it and tested it, and for the life of my I could not get the blade square. It kept digging out chunks of wood with the right-hand edge of the blade, no matter what I did.
Let me make it real clear right now .. I am no expert when it comes to woodworking, but I am not a complete idiot. I can figure most things out.
I eventually took the blade out for the umpteenth time and held the side of the blade to my try-square handle... with the blade being 58mm across, it moved away from the try-square blade by 1mm across it's width.
I know this method of measuring cannot give me great accuracy, but this comes to around 10 degrees by which the blade is not square on the cutting edge. I am simply not happy with that.
I called up the supplier and the manager told me about the lever which moves the blade from side to side, suggesting I use that to straighten the blade. That does not work, I have it moved over as far as possible and that corner still bites into the wood.
The manager suggested that I then tweak the blade 'skew' against the cap-iron, in order to get it straight at the mouth.
No way!!! ... If I buy a car, the dealership cannot expect me to crank the steering wheel all the way to the left .. in order for the car to drive straight!

I'm taking it back.
The manager did not sound to happy, and mumbled something about giving me something of equal value.
That's not going to work either.
I do not need anything else.
I do not want anything else.
... a plane ... a No 6 or a No 7 ... a decent working one ... that's what I want, or my money back.

In honesty, I could have fixed the stripped bolt problem. Although, being 'backwards' thread it would have cost a little bit extra to get a bolt.
I can also have the blade re-ground to 90 degrees at an engineering shop, or if I find a sharpening place... but you know, I just spent R595.00 on this plane. Why should I still need to go to all that trouble to fix it when it's brand new?

This will be the third trip to the center of town, 30km each way. Plus it's been helluva inconvenient.

Winding Sticks

While making my table top, I needed some way to check if the boards were flat. Eyeballing the boards is not really accurate. I read up about it and found out about winding sticks.
I took a piece of scrap wood from my offcut bin and broke it in half to test the theory.
Wow! These little planks really work!
They are extremely easy to use and accurately tell you if the board is not flat.

The wikipedia entry on winding sticks mentions that contrasting wood is often used.
Yeah??
Guess what .. that's exactly what I have.
Contrasting Obeche and Sapele Mahogany strips which are waiting for my boat build to start.
I simply pasted them together to form a stick.
Once I saw them finished, I decided to get a little fancy and insert a strip of the opposite wood as a "centerline" on each stick.
I am hugely satisfied with my new toys.
One benefit to making the winding sticks, was getting to see the colour of my strips with some 'finish' on them.


I used Deep Penetrating Furniture Wax from Woodoc. This brought out the colours with amazing depth. I was actually quite stunned at how beautiful the Sapele Mahogany is. I have subsequently put on a few layers of Antique Wax, also from Woodoc.


Monday 5 July 2010

Chasing your tail .. and getting bitten

Sometimes life gets frustrating for no good reason.
I have waited patiently for the wood strips to arrive for my boat project.

In the meantime I have been dabbling with various other ideas for projects which could run concurrently to the boat project since the boat is really a long term thing.
First off, I must repeat that the space I have is really limited and the boat will take up a great deal of it. For that reason I have been trying to decide if I should make tackle some of my other ideas first.

I need to make a second dog kennel for selling. This will not take very long, but it's a project that would be completed with more ease, if the boat forms are not yet installed on the strongback and taking up two thirds of the garage. Material needs to be ordered if I go ahead with this idea.

A friend caught up with me a few days ago and wants a custom piece of furniture. If I can complete this project to satisfaction, there will be an order for two more immediately, with the possibility of more orders after that. I think this project has serious potential and am waiting for the customized draft plans for the piece before I can proceed with it.

This led me to buying a book which has a plan similar to the custom piece my friend wants. The book has been tempting me for a while and I just needed a reason to buy it. Now I have the book, for a good reason and amongst other things, there is a beautiful plan for a dining table... for which I have some lovely wood for a top.
I think I must make such a table.

There.
So much to do.
  1. Boat
  2. Dog Kennel
  3. Dining Table
  4. "Custom" furniture order (more about this later)
So my strips arrive on Thursday. This is nine days after delivery was due, but as I said earlier, I waited patiently.
The strips are beautiful and I am very happy, but they never sent the two sapele mahogany boards that I ordered with the strips. I thought I had more mahogany strips than ordered, so I figured they cut strips from all the planks, instead of saving two.
On Friday I went to the lumber merchant to get clarification.
When I got there, the guy who always helps me, rushed to tell me that he had my two planks and they were due for delivery again that same day. Ok, cool! (They've not been delivered - apparently I can now expect them on Monday. Tuesday will be fourteen days after the original promised delivery date)

So since I was already at the lumber yard, I bought a little extra wood for legs, rail and support framework for the dining table project.
One of the lumber yard customers approached me, asking if I could make him a special wine-rack. I gave him my cell-phone number. Seems like I get approached for things from all quarters.

Whilst busy selecting wood, waiting for the planks to be trimmed and planed, I got distracted and "lost" my cellphone.
We called it from the office, it rang to voicemail, then when it was called again it was switched off. It's nowhere to be found - so it's undoubtedly been pilfered.

It's such an inconvenience. 6 years worth of numbers and contact details gone. I cannot get a replacement until Wednesday at the earliest, but I'll try to get my existing number...
My wine rack customer is probably calling me and wondering why I never answer my phone.

If the Mahogany planks were delivered as they should have been, I'd never have been at the lumber merchant on Friday afternoon.
The boat already has a sad memory attached to it. :(

Sunday 4 July 2010

Understand wood distortions...

In a previous post I mentioned that I did not know the correct term to describe a specific distortion in wood. So I have been doing some reading research.
So far I have found that wood will distort in four principal ways. These would be the four general ways of describing boards which are not flat.

In these pictures, the distortions are shown, in comparison to a normal flat board.
  • Bow - the board curves in it's length, around the wider side.
  • Cup - the board is curved in it's width, whilst it stays flat in it's length.
  • Spring - again, the board is flat but is curved in it's length, this time it curves around the thinner edge.
  • Twist - the board twists up in opposite directions around the ends.

Tuesday 29 June 2010

How I create a butt-joint

Simply said, a butt-joint is a very easy joint to make, but it is not very pretty or strong. Much depends on which method you use, but most often this joint is held together by the glue in the joint.
I try to always add some dowels to my butt-joints. The wiki entry has some good descriptions and pictures of butt-joints, but here is my version.


Most often I use 6mm ready-made dowels. These are normally slightly grooved and thus hold a bit more glue. Another option is to purchase a 6mm stick and cut custom lengths.

Saturday 26 June 2010

Step-by-Step tutorial to create a desktop router table. (Part I)

Original plans for the basic table referred to in this tutorial come from Jeff Greef Woodworking. Modifications were made to suit my preferences.
All measurements and joints can be altered to your requirements or skill levels. Since my lack of tools and/or skills prohibit me from making even simple lap-joints, all joints used in this table are butt-joints with dowels and glue holding it all together.

Materials Used:

All these pieces are from 16mm MDF (Supawood)
  1. (Number 1): 670mm x 50mm x 16mm (2 pieces)
  2. (Number 2): 250mm x 50mm x 16mm (6 pieces)
  3. (Number 3): 470mm x 50mm x 16mm (4 pieces)
  4. (Number 4): 318mm x 50mm x 16mm (2 pieces)
  5. (Number 5): 670mm x 495mm x 16mm (2 pieces)

Step 1: Using 2 feet pieces (Number 1), lay them out parallel, 395mm apart.


Step 2: Create the left side using 2 uprights (Number 2) and 2 crosspieces (Number 3). This side fits into the center of the foot piece as shown.

Step 3: Duplicate Step 2 to create the right side.


Step 4: Use 2 uprights (Number 2) and 2 crosspieces (Number 4), to create an end piece.


Step 5: Use 2 tabletop pieces (Number 5), aligned with the foot pieces, to create a table top.


This is your basic table for a router.

Attaching a router to the bottom of this table top is not an option with the table top being 32mm thick. We need a router plate.
  • Using a 200mm x 200mm x 8mm piece of aluminium I cut a center hole for the router bit (60mm dia). In future, additional router plates can be cut, which would have larger or smaller holes for different bits.
  • Drill holes to fix your router to the router plate - these holes will vary depending which model router you have.
  • The hole in the table top for the router plate is cut off-center, simply as it is my preference - gives more table room for work pieces. The router plate hole is 8mm deep and 200mm x 200mm. I simply set the router to 8mm deep, and clamped guides to the table top and routed the hole. The rounded corners were chiseled square to accommodate the square plate. (You might want to round the corners of the aluminium plate rather, but again, it is personal preference.)
  • Leaving a lip of 15mm around the inside of the router plate hole, a 170mm x 170mm hole is then cut all the way through the table top.
  • This leaves us with the router table, complete with router plate to which to attach a router.


I will continue this tutorial later by creating a fence for this router table.

There's nothing like getting a job done...

I needed a router table and not being able to afford buying what I want, I decided to look for plans to build my own. Searching the internet I found plans for a desktop version which I thought was suitable at Jeff Greef Woodworking. I modified this plan slightly in terms of size mostly, due to wanting to use what wood I had available.
I found plans for a split fence at Sawdustmaking 101. I modified these plans slightly to accommodate what I could find locally.
Thanks to these free plans which people so graciously supplied, I now have a piece of equipment that would have cost me a small fortune if I went and bought a similar product.

Here are some pictures of the (almost) finished product.


In the following picture, the knobs "A" can be loosened to allow the complete fence assembly to slide on the T-tracks. (Click Here to see how I made the T-Track)
The nuts "B" are loosened as required to adjust the near fence (forward fence) in order to allow thinner or deeper cut. These are then tightened prior to making cuts.
A close-up of the pillow-blocks and the threaded rod which attached to the "forward fence". This fence is adjustable in relation to the "stationary back fence" and this adjustment allows me to choose how thick a slice to route off the edge of my material.
I know that these pillow block bearings are pretty large and probably excessive, but I got them dirt cheap and they do the job just perfectly.

There are probably a million changes that could be made to these plans to make things better or more accurate.
One feature I have not yet completed is a small "box" around the cutting area of the fence which will facilitate the control of dust from the cuts. I want to make something that will attach to the vacuum.

For now I am pretty happy. This is portable and small enough to serve as a table when not in use. Whilst I was building it, I used the table as a bench for the drill press. No reason not to continue using it for that purpose too.

Thursday 24 June 2010

Still waiting...

I've been patient in waiting for lumber to arrive, but it's mind-numbing.
I've tidied up a fair bit and built new shelves along one wall. One shelf for holding stock materials in the 3m range - and my strips will live there too. A second shelf for tools and general odd & ends, which helps general neatness.

I am working of a router table (desktop version). The idea is from various internet sources, but I am struggling to incorporate a few of the ideas.
I am now busy sourcing a router plate, and also building a split fence. The fence is taking some time to get aligned properly. I might have to redo one small portion.
I'll post pictures as soon as I have anything decent.

Monday 21 June 2010

Lumber ordered .. now the wait.

I went to my local lumber merchant on Friday and ordered the lumber for my boat. It's getting delivered, so hopefully it will be here tomorrow (Tuesday).
In preparation to mill my own strips I decided to spend money on a new saw blade which has a thin kerf. (Kerf: a groove or slit in material caused by cutting) This would waste 2mm per cut, instead of 3mm. Since each strip would be 6mm thick, this means an extra strip per each six cut strips. Nice!

Planks from which strips will be cut are generally 150mm-200mm wide, they are around 25mm thick and vary in length from 3m to 4.8m. The strips need to be approx. 19mm wide, 6mm thick, by the length of the plank (preferably 6m - but this is not available).
This picture gives you an idea of how the strips are milled from a plank.


This milling operation has been really stressing me. It's a huge task to accomplish alone, when you are lacking a lot of tools to help ease the job.

A 3m long plank must be fed into the table saw, keeping the plank tight against the fence, maintaining a steady speed, and the same plank must be caught at the outfeed side, together with the strip which has been cut.
Space is my primary concern, but the amount of noise I would generate would be a second and valid concern too.

When I got to the lumber merchant, the man helping me, milled some sample strips. I was dumbstruck, since the lady on the phone told me that it was impossible for them to mill the strips.
Anyways, after seeing this, I went straight to the lady and requested that the wood I order be milled into 6mm strips. Since I showed her the sample strips, she happily agreed. Wow. How nice is this? I'll be getting my strips delivered (together with a few planks which I need to custom cut) with no further work required.
I walked out of there with a huge smile on my face.

Oh, and least I forget, the wood I ordered was Obeche for the main body of the boat and African Mahogany for the accent strips, for the keel, king plate, gunwales, seats, etc.
I am fairly certain that there will be no problems with the mahogany. As far as the Obeche is concerned, I am hoping for the best since I have no idea if this will be acceptable. Personally I see no reason why this wood is not going to work just fine for the task I have in mind for it.
I spent a good part of three months looking for help regarding which wood I could substitute for Western Red Cedar, which is the designer recommendation. Obviously I need a substitute which is readily available in South Africa. The only cedar I found here, are short planks of 2.4 meter length and horrendously full of knots. It is my layman's opinion that every single strip will crack at a knot, somewhere along it's short length.
Looking for advice has been an absolute dead-end.
I have written to numerous people and requested advice. Of all the people I wrote to, I received two one-line replies and the rest never bothered to answer. I wrote to a boat designer, a naval architect, an expert woodcrafter who claims to have learnt his craft in the boating industry, a few lumber mills, a specialist in lumber procurement and a company specialising in supplying the marine industry, amongst others. I also posted in forums, one specialising in wooden boats and never got any advice from there either.

So, at the end of the day I am left to my own devices, having to make choices based on my limited knowledge. Hopefully I can come up with the right combination of choices, build my boat, and end up being able to pass along the advice to the next guy looking...

Thursday 17 June 2010

Forms - backbone of the cedar strip boat.

I received the plans for the Rangeley 17' Lake Boat on A1 sheets.
In total there are 16 forms and a transom, and these must be anchored onto the strongback after they've been cut. These forms form the skeleton around which the cedar strips are aligned. Once all the cedar strips have been placed and attached to each other, the forms can be removed.

The plans for 8 forms are on one sheet. In addition it's only half the plan, as the plans are symmetrical around the centerline.
In order to cut the forms I needed to transfer the plans to 16mm MDF (Medium Density Fibreboard) also known as Supawood.

Taking 8 sheets of A4 carbon paper, I glued the edges together to create a larger sheet (approx A2 size).
I made two of these sheets.
One sheet is placed face down, in order to transfer the plan to the wood when traced over.
The second sheet is placed face up, when doing the original half of the trace, in order to transfer the plan to the back of the original plan.
This original plan can then be flipped over, aligned with the half that's just been traced, and then the second half of the plan can be traced to the wood.
It's tricky to get everything aligned. Be patient and take care in getting everything in place.
Carbon paper is not your friend, it wants to roll up into tight cylinders. Use wooden offcuts to keep the corners flat.

Creating full size plans of the forms, each on a separate sheet paper would be preferable. Glue these sheets to the MDF with normal aerosol spray adhesive. At over R500 for printing costs, I decided I'd stick to tracing.

Subsequent to doing my tracing of the plans, I was told I should have used a tailor's pattern wheel . This leaves small holes in the pattern and in the wood. Coloured chalk on the back of the plan prior to the trace will leave the holes in the wood with a chalk outline, making it more visible. This would probably have been faster than my shaky old hands trying to trace the curve of the hull ... SIXTEEN TIMES !

I used a jigsaw to cut the forms after I completed the tracing.
I cut slightly proud of the lines, leaving approximately 1mm on all edges. This extra was sanded back with a random orbital sander. A bench sander would be good for this job, but I do not have one, so I made a temporary jig to create one. More about that in a later post.

Since the forms are 16mm thick and I have the plans traced to one side, when I sanded I bevel-sanded so that the other face of the form is slanted away from where my strips will touch the form.

Here are two pictures of what the forms will look like once they are attached to the strongback. ( I did not spend the hours required to draw the exact shape of the hull into these forms, but you will get the general idea)

From the rear...
EDIT: - it is interesting to note in the picture above how the forms are not "fair". A “fair” hull is one with no dips or bumps in the longitudinal lines of the hull. As I said earlier, these forms are drawn merely for purposes of giving you a visual of forms on a strongback and do not conform to my hull's shape. I'll post real photo's when I get the forms onto the strongback.

From the side...
I have completed the cutting and sanding of my forms, but not yet attached to the strongback. I need the space.
Tomorrow I will go shopping for lumber to mill the strips needed to build this boat. I have to mill these planks into strips before I can start. That means I need about 4m infeed and 4m outfeed at my table saw to complete the job. It's going to be tight.
I will only attach the forms to the strongback once all that is done.

Wednesday 16 June 2010

How to build a STRAIGHT strongback.

All Materials used in the building of my strongback are my measurements and are not standard. You can use whichever lengths you can get.

Overall measurements for my strongback are 5400mm long, 204mm wide, 200mm high.

Since the longest single piece of lumber was 3000m I had to join various lengths of various materials together. Joins were staggered in order to maintain a semblence of rigidity.

Materials Used:

  1. 4 x 22mmx44mmx2800mm Meranti planks (#1)
  2. 4 x 22mmx44mmx2600mm Meranti planks (#2)
  3. 6 x 12mmx200mmx1800mm Plywood board (#3)
  4. 4 x 12mmx180mmx2400mm Plywood board (#4)
  5. 2 x 12mmx180mmx600mm Plywood board (#5)
Taking two #4's and one #5, lay them end to end in a straight line.


From an edge that is known to be straight, draw a CenterLine down the length of each board.
Using a 2m aluminium straight edge ensure that your boards are laid out STRAIGHT.
I took care to ensure I had a straight edge on each of these boards and that they were cut to equal widths. Thus both left and right edges lined up straight with the straight-edge.

Using one #1 plank and one #2 plank, line these up along one edge of the boards.
Attach these with wood screws every 20-25cm. Ensure these planks are flush to the edge.

Repeat this process for the second edge of the boards.

Ensure that your CenterLine remains straight during this whole process!!!
Note: Bearing in mind that your planks could be warped slightly, compromise on the edge flushness, but not on your CenterLine. If the CenterLine is straight, the board edges will align straight too.

This complete side becomes a "bottom". Duplicate this to create a "top".

Using three #3's, enclose one side as shown in the following picture. Try to ensure that your edges remain flush.
Remember that every time you attach a new board, use the straight-edge (clamp it into postition if you have to) to ensure you have everything STRAIGHT.
Check and double check straightness at every opportunity!!! Once you have screwed in wood screws, it is difficult to re-align a board. You will be moving screws to new holes, leaving old holes all over the place.

Now, using three #3's enclose the last open side of the strongback.

And there you have it.
It sounds simple.
It is simple.

But it's even easier to get it slightly skew. And once you have something skew, the end result is skew and everything escalates from there until you have something that you cannot work from.

Take care,
Measure everything,
Measure again,
Be patient.

here's .... Bonnie!

Since I have received a number of emails regarding Bonnie and her kennel, I thought it's time to introduce her. It's a month since the operation and she is doing much better.


Here she is on one of her garden excursions. She is allowed outside a few times per day to relieve herself and stretch her legs.
No stairs or jumping! But she has been reasonably well behaved.
Except for slyness...
She is getting way too clever. She sits and cries in the kennel, just to get let out, and then she has no special needs, just wants outside.
She would always listen to me the best. If I call, she'd go straight inside and into the kennel. Until yesterday. Now when she gets called, she hides under a bush in the garden.
I've left her outside for a few hours at a time and if she remains still it's no problem. The problem comes with the backdoor, it has 4 steps and a doggy-door. Bonnie wants to go there and try to enter the house, even though the doggy-door is shut. It's the "No Stairs" policy that's being broken.

Just two more months of kennel time. Then all will be fine.
By then the patch on her back will be re-grown too.

Here is Katana, Bonnie's "sister".


Katana has become my apprentice in the garage. She loves following me around all day. Every time I lift a tool, or a metal ruler, there is a chance to chase reflections. Oh, and then there is that large ostrich-feather-duster .. if only she could get at it.

Tuesday 15 June 2010

Building a Strongback for the Stripper

The strongback is the foundation upon which the cedar strip boat, canoe or kayak is built. These are commonly called "Strippers". There are different variations of strongback for different types of boat. My strongback is simply a long "box" with legs, above which the forms will be attached.
The strongback needs to be straight and level. Accuracy in this step will ensure that the boat will be built on an accurate foundation.

Here is what the strongback should look like when complete (without it's legs).
Since the longest piece of plywood available is 2440mm and the longest "stringer" length is 3.6m, I need to create joins all over the length. These joins need to be staggered to preserve rigidity.

So easy ...
... or so it seems.
Simply buying plywood, having it cut to size and slapping it all together is no guarantee that you will end up with a straight strongback.
Ask me, because I did it.
  1. I had the two plywood sheets (2440mm x 1220mm) cut into strips of 200mm x 2440mm each (twelve strips).
  2. I bought the straightest meranti "stringers" (22mm x 44mm x 3000mm) that they had. The pine was so crooked, that the 20% extra price of the meranti seemed a bargain. Even so, the meranti planks were definitely not straight.
  3. Figuring that I would "pull" the meranti strips straight by ensuring they mount flush to the edges of the plywood sheets was my intention. I did this with both the sides.
  4. Then flush-mounted the covering sheets on the top and bottom, closing the box.

I ended up with a mess. On the best "face", the curve in the box meant that from one end to the other, the "Centerline" curved by 30mm.

Firstly, the suppliers did not square the sheets properly before cutting. I did not check this, I assumed they would do a good job since they cut wood every day, all day long.
Secondly, of the twelve sheets, three sheets were "curved" along the edge. Perhaps this picture explains it best as I do not know the terms used to describe this type of flaw.How on earth do they cut like this? That saw they have is so amazing, I cannot imagine how skilled you need to be to get a cut like this. *cough*
This is the main cause of the "bend" in my strongback.
Thirdly, whilst I asked for sheets to be cut to 200mm, some sheets varied from 201mm at one end to 197mm at the other end of the sheet.
Fourthly, neither of the ends of the sheet were squared. When you lay them end-to-end you will never get them aligned straight unless you leave gaps.

So unless I have equipment to do the cutting myself, I am at the mercy of having to deal with "substandard" lumber.

I am now in the process of fixing the strongback.
I have had to resort to purchasing one extra sheet of plywood to replace the rounded sheets. I cannot fix them on my table saw because I am just not equipped with proper fences and slides. If I build a holding jig I would probably be able to fix the curved sheets, but that would mean buying a sheet of plywood to build a jig. Catch 22.
This 3rd sheet I had cut whilst I "supervised" the cutting to ensure he did what I wanted. (The cutter was not very happy with my interference but I had permission from the manager).
Still I have to rely on substandard materials, but with these lastest boards, I have enough straight pieces for two sides. Together with the best of the "substandards" I am confident I can fix the strongback.

My strategy is slightly different this time.
Each "side" of the strongback is made up of either 3 or 4 boards of 200mmx 12mm plywood (varying lengths to ensure staggered joints).
This time I have a center line marked on each board prior to fitting.
I am using a 2m long aluminium straight edge to align the edges of these boards before any screws go in.
Clamp them in position, screw it tight. All edges flush (or as flush as I can get it).
Checking squareness and level, after every screw goes in. It's slow ... painfully slow ... and my back hurts, but if it ends up with a square strongback, I will smile.

I cannot yet say this will resolve my issue, but thus far things seem to be straight and I am 2/3rds done. I hope for the best.

Sunday 13 June 2010

Better internet advertising please...

I cannot understand the uselessness of South African companies when it comes to advertising on the internet.
There is a huge untapped market out there, yet no-one seems interested in using it.
Searching for materials for my boat build has shown me the futility of using the internet. It basically just creates sadness.
I search for product, find great solutions, the perfect item, then I try to find a supplier in South Africa and I run into a brick wall.

Here are some examples...
1. I searched for oversize carbon paper (or any tracing paper). This is available overseas from numerous sources, one being Glen-L, who supply oversize sheets. After 3 days of searching in South Africa, I eventually found a company who makes carbon paper. They will supply me, if I buy 500 sheets @ R3600.00 ... yea thanks... but no thanks.

2. I searched for a thin kerf blade. If I am going to mill strips for my cedar strip boat, I will need to cut 5mm thick strips. If I can get a thin kerf blade which wastes only 2mm per cut (as compared to the normal blade which wastes 3mm per cut) then I basically get a free strip for every five cuts. Economically this will save a lot of wood, ermmm rands too. Nowhere can you find out who supplies saw blades in South Africa. Three different local hardware stores cannot help. Neither can they get one for me, nor tell me who to contact. The average employee at a hardware store knows nothing about the products his store is selling and basically they want me to use what they have in store.
I finally found Bantam. I called them and got hold of a lady called Vanessa. This lady was amazing. She understood my needs, spent time on my concerns and gave me a list of hardware stores and tool centers that should be able to help me. She gave company names, addresses, contact numbers of six different companies and then told me that if I still had problems, to call her back and she'd sort it out.
Wow. I like that for service. So few and far between. Suffice to say that I finally found someone who could get me a blade. A special order, and I have to wait a few days for it to arrive, but at least the gentleman knew how to help me.
Thank you to Vanessa from Bantam.

3. T-track. This stuff is so common in USA that there is a website called ttrackusa. I want some of this to create a track in my desktop. So that I can slide a fence, or clamps along the face ... or along the sides.. of my desk.
Well, no-one in South Africa knows what this stuff is, nor has ever heard of aluminium such as this.
I went to a shop specialising in non-ferrous metals and although they had huge warehouses full of different aluminium extrusions, nothing was remotely close to what I need.
Eventually I went to Chamberlain's and bought four pieces of 2.5m long 20mmx10mm aluminium rectangle for R40 each. I then went to a guy who makes aluminium windows and asked him if he would cut a strip out of the one side to create my own "t-track". He said no problem, and proceeded to rip me off with the price when I collected next day. Instead of R60 like he verbally quoted me, it was suddenly R50 per cut - more than the price of the original material. Still I was fairly happy in that I had the track I wanted. cost R90 per 2.5m length. The cutting did leave some nasty "burrs" on the inside of the cut, but a fine file, followed by 600grit sand paper took care of that.

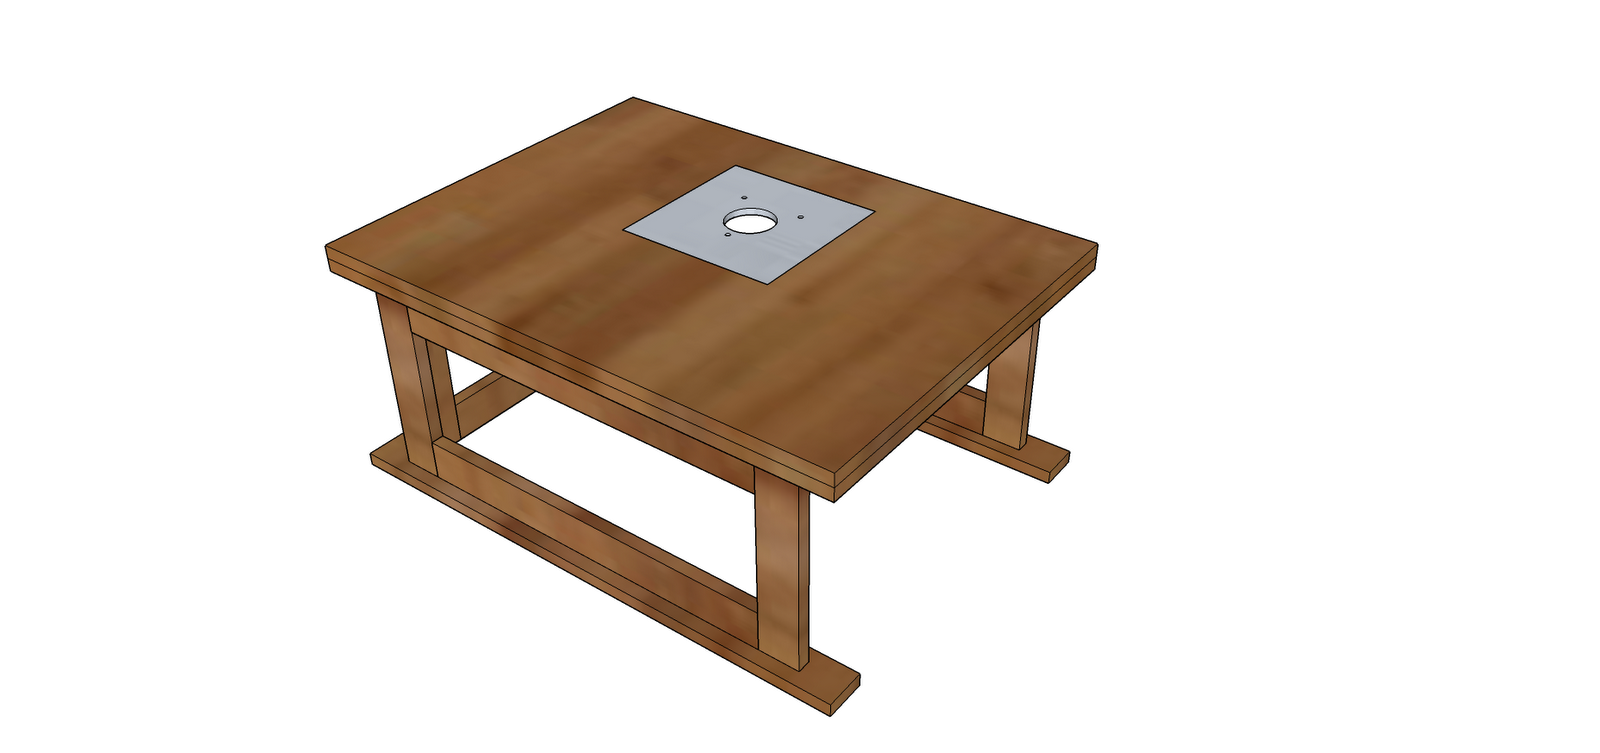
Here is a sample of the track embedded in a "desktop"

... and this is what I used it for ... a fence/clamping system for my drill press ...

I will use the T-track for a number of other applications and will post about it when I get round to it.

These examples above are just a few of the multiple examples I have of struggling to find products.
Finding advice on which type of South African timber to use in my boat building project has been just such a mission. Most people or companies who have been approached do not even have the decency to reply. I am still struggling to find out exactly what I am going to use, but at the end of the day, I will solve it... and my project will taste all that much sweeter, due to the struggles in getting it completed.

The bottom line remains, that whilst plenty product is available in South Africa, finding it is the problem. Even companies with websites, do not advertise their product correctly.
One such example is marine-grade plywood. I struggled for many days to find this. The only supplier I could find on the internet was a guy in Cape Town. The transport cost to Pretoria is prohibitive. A few days later I was speaking to someone about lumber at a lumber supply yard and by chance I asked about marine-grade plywood. They told me to call Schallies. Perfect. A friendly and helpful sales consultant called Harold, all the marine-grade plywood I could ever want and cheaper than the Cape Town price. Right now, I just cannot remember if delivery was free in Pretoria or if it was R100. Either way, it's a bargain.

Dust Busting

So just yesterday I got a call from Craig in England. We ended up discussing dust, and the second hand machines he is able to find at their "dump sites". Ya, so today I am busy cleaning my garage and I am using Abby's Hoover vacuum cleaner. Next minute it stops working, just dead.

Is that some kinda magic?? or karma??

I'll need to make a plan to get her a new vacuum. As if I do not have enough headaches looking at all the tools and not knowing which I REALLY need or can afford, I now have to learn about vacuum cleaners. ... and less money to spend on building boat.
But since I am going to end up using the vacuum the most, I am not really complaining too much :)

I am wondering if the motor of this vacuum can be salvaged - perhaps even re-incarnated .. I wonder.

Saturday 12 June 2010

Which Boat to Build?

This is something that I have really spent a great deal of time over.

Most people would know what use they intend to put the boat to.
I do not.
The main purpose for me right now, is the build itself, more than the end use of the boat.
The ideal situation for me would be to build the boat and sell it, before building another boat. I need to keep busy and will not be able to afford building a second boat if the first is not sold. But that is all in the future. In the meantime I need to build.

After looking at hundreds of boat plans, there are a few favourite plans which I would have no problem attempting. Let's have a look...


1. Flats Flyer. This is a beauty from Glen-L. I would make a few deck changes to create the front half of deck to be like bassboat, with a smallish wet-deck style at the rear. Would need to decide if I also make a center console or bass-like cockpits/seats.
This really is a build that could end up with an exciting boat - for bass fishing and also usable in the estuaries and inshore coastal reefs along the coast.
To build this boat I would need more space - double garage at least.


2. Ragtime. A Grande Olde Lady from Chesapeake Marine Design! He-he, I like this boat very much. Much more sedate than the Flats Flyer, yet elegant and classy. I can imagine many countless hours spent building this beauty, choosing wood, sanding, polishing - endless attention to detail, will ensure a masterpiece. How can you not love it? This boat would adore Knysna lagoon or Gamtoos river.
At 21' - to build this boat I would need more space.


3. Lobster Boat 26. The largest boat on this list and is from the Bateau stable. Very stylish compared to the majority of plans available to the amateur boat builder. A hard top, seating in the cockpit or even cabin changes can all be accommodated with careful planning, making this a very versatile boat. Day cruising, weekender or a plain ole fishin' boat - makes yer choice!!
At 26' - to build this boat I would definitely need more space. Being designed for an inboard is a second inhibiting factor as the cost of new inboards are close to R100k right now. You just cannot put a secondhand into a beaut like this.


4. Ocracoke 20. This is a WOW boat from B&B Yacht Designs. For offshore and estuary fishing, it's going to be a dream. Great lines, give you a boat that is going to look good and get appreciative comments. Comfortable fishing, light and economical. I think this would make a perfect boat for a quick Sunday run to the fishing grounds.
To build this boat, I would need at least a double garage.


5. Outer Banks 20. Although I find this to be a strange name, it's definitely a beauty. Also from B&B Yacht Designs. Spending time on the estuary or lagoon in this boat is simply going to be a dream. Build this boat with care and attention to detail, fit it out to your (and the missus') fancy and it will be like being in 5-star luxury all the time. You'll probably need a few "DO NOT DISTURB" signs to keep all the fans away when you want to catch a mid-morning nap. This boat was designed for "every-weekend-on-the-water".
To build this boat, I would need more space... again at least double garage.


So after all this, you can see that I am in a conundrum. I do not have space to build any of my favourites. Either I wait until we find a place with some space, which could take a while, or I compromise for something smaller.
I cannot wait. I am too impatient. When I decide I want to do something, I need to get a move on.
So I made a compromise.
I'll build a boat I can
a. afford,
b. fit into the garage,
c. practice a lot of new techniques on a cheapie.

The Rangeley 17


Small enough - to fit into my single garage. Just!
Pretty enough - I might just find a customer for it.
Useful enough - I could end up using it without any problem. Imagine fitting this with a small torqeedo electric motor and trolling a lure behind you as you cruise up and down Gamtoos river. You'll pull out a few huge cob. Near the mouth you're liable to hook elf or garrick too.

I will keep posting regarding the building of the Rangeley.

Sunday 6 June 2010

Building a kennel/table

After finding the idea on the internet I decide I was going to build a table, with a dog kennel enclosed underneath. Functional, pretty and the table can always be used as a stand-alone.

I used Sketchup and started designing the Table Kennel and a cutting list. One sheet of 18mm plywood was ordered (2440mm x 1220mm) and cut to size by the supplier.

Photobucket

I sanded all pieces and the four kennel sides were drilled to accept dowel bars.

Photobucket

At first, I was going to go with wooden dowels for the bars, then I found aluminium round tube which was slightly more expensive. Wood and metal gives a much better look.

Photobucket

No fancy jointing - I simply marked and drilled holes for 6mm wood dowel pins.

PhotobucketPhotobucketPhotobucket

Stained Mahogany Gripseal® gave the project a whole new look.

Photobucket

The table and the kennel. Two hinges and two sliding bolts ensure easy access.

PhotobucketPhotobucketPhotobucketPhotobucket

All in all, it could have turned out worse.